Easy Drawing with Crosshatching Line Technique in Art
Learn how to create and easy drawing with crosshatching line technique in art in this online art lesson. Practice shading in a quick and easy still life using simple hatched lines. Draw with me in this quick step-by-step tutorial.
Equipment
- Pencil
- Paper (Drawing paper is best but you can use whatever you have available. I am using a 5.5 x 8.5 inch spiral bound sketchbook with 60lb paper)
Instructions
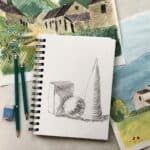
- Mark the top and bottom of the cone. Draw a guide line down the center of the cone. Make a curved line for the bottom of the cone and then draw in the sides.
- The sphere sits just a little bit lower than the halfway point of the cone. Lightly sketch in the sphere. Continue to go over the lines until it is round.
- The box sits just a little higher than halfway point of the cone and behind the sphere. Draw in the front of the box then angle the sides back. Connect the sides to form the back of the box.
- Erase the guidelines and darken the lines of the shapes.
- Shade in your drawing by crosshatching. Start by making a set of parallel lines then turn your direction and make another set of lines in the opposite direction. Leave the lightest areas with no crosshatching at all. The top of the box and the area behind the sphere is in more shadow so hatch over that area again making it even darker.
- To shade in the sphere, use crosshatching lines that are slightly curved. This is also called contourhatching. Turn and make another set of slightly curved lines in another direction. Leave the highlighted area white and the reflected highlight area (at the bottom, in the shadows where the light hits the table and reflects back onto the sphere) slightly lighter.
- Sketch in slightly curved hatch lines, following the bottom contour of the cone. Allow the lines to go about halfway across the cone. Make lines in another direction but only cross about halfway over the first set of lines to show a transition to lighter values.
- Add shadows at the base of the shapes where they meet the table by drawing lines and then adding another set of lines going in the opposite direction.
Notes
Keep your first lines and guidelines or marks very light so they are easy to erase if needed.
You can keep going over a crosshatched area in different directions until it is as dark as you want it.
For very light areas don’t use any cross-hatching at all, just leave it the color of the paper.
Hatching and crosshatching lines do not always need to be regularly spaced, the spacing can be different between different marks or different areas of a drawing.
Crosshatching can also be combined with shading to create overall value in a drawing.